| McMaster University - Chem2O06 Lab Manual | 1997/98 |
Microscale Laboratory Techniques
Traditionally, experiments in organic chemistry are carried out on a macroscale level, employing quantities of chemicals on the order of 5-100 g, using glassware designed to contain between 25 and 500 mL of liquids. For quantities of materials in the 0.005-0.5 gram range, one employs different, "microscale" techniques and equipment in order to carry out the various standard organic laboratory operations. In the following, the student is introduced to the special equipment used in microscale experiments, as well as the somewhat different methods which are used.
This document is also available as an index file, with the individual chapters contained in separate files.
Basic Equipment
Handling of Liquids
Handling of Solids
Carrying out Reactions
Extractions
Recrystallization
Distillation
| Basic Equipment |
The glassware used for microscale experiments is contained in a kit which the student obtains from stores at the beginning of the laboratory period and returns at the end. The Stores technician will ensure that a complete kit is given to the student when it is picked up, and will check it on its return to ensure that it is complete. The student will be charged for missing items.
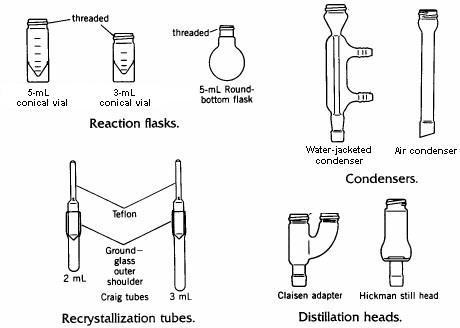
Some of the contents of the microscale kit are illustrated in the drawing below.
The conical vial is used as a reaction vessel, for extractions, and as a storage container. Its flat base allows it to stand upright on the laboratory bench. The interior of the vial tapers to a narrow bottom, making it possible to withdraw liquids completely from the vial using a disposable Pasteur pipet. The vial has a screw cap which tightens by means of threads cast into the top of the vial. These threads also allow attachment of various other pieces such as a condenser or distillation head, using the double-caps provided in the kit.
| Handling of Liquids |
Since one rarely works with volumes larger than 2-3 mL, graduated cylinders are rarely used in microscale experiments. Instead, one uses smaller scale volumetric devices such as syringes, automatic pipets, and calibrated disposable Pasteur pipets.
Automatic Pipets are commonly used in microscale organic and biochemistry laboratories. They are available in different sizes, and can deliver accurate volumes of aqueous solutions from 0.10 mL to 1.0 mL. They were not designed for use with organic solvents and are generally less accurate depending on the liquid. Automatic pipets are very expensive, and it is critical that the student handle them carefully and responsibly. Follow the steps outlined below to use an automatic pipet:
1. Select the desired volume by adjusting the micrometer control on
the pipet handle.
2. Place a plastic tip on the pipet. Be certain that the tip is attached
securely.
3. Push the plunger down to the first detent position. Do not press the
plunger to the second position. (If the plunger is pressed to the second detent, an
incorrect volume of liquid will be delivered).
4. Dip the tip of the pipet into the liquid sample. Do not immerse the
entire length of the plastic tip in the liquid. It is best to dip the tip only to a depth
of about one centimeter.
5. Release the plunger slowly. Do not allow the plunger
to snap back, or liquid may splash up into the plunger mechanism and ruin the pipet.
Furthermore, rapid release of the plunger may cause air bubbles to be drawn into the
pipet. At this point the pipet has been filled.
6. Move the pipet to the receiving vessel. Touch the tip of the pipet to
an interior wall of the container, and slowly push the plunger down to the first detent.
This action will dispense the liquid into the container.
7. Pause one or two seconds and then depress the plunger to its second
detent position to expel the last drop of liquid. The action of the plunger may be stiffer
in this range than it was up to the first detent.
8. Withdraw the pipet from the receiver. If the pipet is to be used with
a different liquid, remove the pipet tip and discard it.
Syringes are especially useful when anhydrous conditions must be maintained during an experiment. The needle can be inserted through a rubber septum sealing the reaction vessel, and the liquid added to the reaction mixture. We use plastic (polyethylene) syringes which, although they are called "disposable", can be cleaned and re-used. While the polyethylene barrels are impervious to most solvents, the plungers are made of a less inert material; thus, these syringes cannot be used with __________. To fill the syringe, insert the needle into the liquid and draw in the required volume. Withdraw the syringe and pull the barrel back ever so slightly to draw any liquid remaining in the needle into the syringe.
Disposable Pasteur pipets are used for dispensing small quantities of liquids, as filtration devices, and as columns for small-scale column chromatography. Although they are considered disposable, you should be able to clean them for reuse as long as the tip remains unchipped.
Pasteur pipets may be calibrated for use in operations where the volume does not need to be known precisely, such as for measurement of solvents need for extraction and for washing a solid obtained following crystallization. To calibrate a Pasteur pipet, weigh 0.5 g (0.5 mL) of water into a small test tube on a balance. Attach a rubber bulb to a short Pasteur pipet. Squeeze the rubber bulb before inserting the tip of the pipet into the water. Try to control how much you depress the bulb so that, when the pipet is placed into the water and the bulb is completely released, only the desired amount of liquid is drawn into the pipet. When the water has been drawn up, place a mark with an indelible marking pen at the position of the meniscus. A more durable mark can be made by scoring the pipet with a file. Repeat this procedure with 1.0 g of water, and make a 1-mL mark on the same pipet.
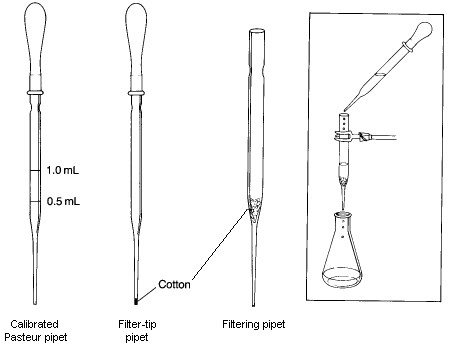
A Filtering Pipet is used to remove solid impurities from a liquid with a volume less than 10-mL. To prepare it, a small piece of cotton is inserted into the top of a Pasteur pipet and pushed down to the beginning of the lower constriction in the pipet. It is important that enough cotton is used to collect all the solid being filtered; however, the amount used should not be so large that the flow rate throught the pipet is significantly restricted. The cotton plug can be pushed down with a long thin object such as a glass stirring rod or a wooden applicator stick. In some cases, such as when filtering a strongly acidic mixture or when performing a very rapid filtration, it may be better to use glass wool in place of the cotton, even though it is not quite as good as a filtering aid. To conduct a filtration, the filtering pipet is clamped so that the filtrate will drain into an appropriate container. The mixture to be filtered is transferred to the filtering pipet with another Pasteur pipet. If the volume of the mixture being filtered is less than 1-2 mL, you should rinse the filter and plug with a small amount of solvent after the last of the filtrate has passed through the filter. If desired, the rate of filtration can be increased by genly applying pressure to the top of the pipet using a pipet bulb.
A Filter-tip Pipet is useful for transferring volatile solvents during extractions and in filtering very small amounts of solid impurities from solutions. It is made by loosely shaping a tiny piece of cotton into a ball, and pushing it to the bottom of the pipet using a wire with a diameter slightly smaller than the inside diameter of the narrow end of the pipet. If it is difficult to push the cotton into the tip, you've probably used too much cotton. To use the filter-tip pipet, simply draw the mixture to be filtered into the pipet using a pipet bulb and then expelling it. With this procedure, small amounts of solid will be captured by the cotton.
| Handling of Solids |
Microscale experiments involve quantities on the order of 200-300 mg at most, and it is thus important to be able to weigh solid substances to the nearest milligram. This requires use of a sensitive top-loading balance protected against drafts with a shield, or an analytical balance.
All weighings must be made into a previously weighed ("tared") container. The tare weight is then subtracted from the total weight of container plus sample to give the weight of the sample.
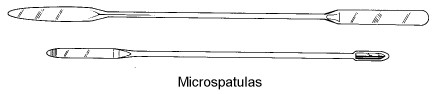
Solid samples are manipulated using microspatulas similar to those shown below. The larger style is more useful when relatively large quantities of solid must be dispensed.
| Carrying out Reactions |
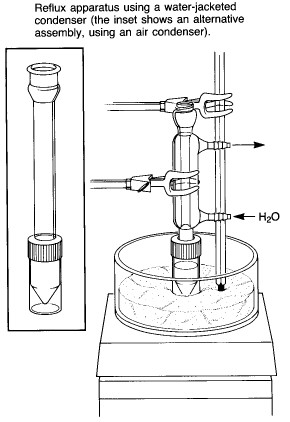 |
A typical assembly for heating a reaction mixture under
reflux is shown at the left. While an air condenser is adequate for most applications, a
water-jacketed condenser is also supplied, for cases where the solvent is very volatile or
where the ambient air temperature is very high. A "spin vane" might also be
included for magnetic stirring of the reaction mixture - this is a triangular device
coated with teflon, which is shaped to fit the bottom of the conical flask. Note that the apparatus is clamped at the condenser rather than at the flask, as one would do for a macroscale experiment using conventional ground-glass joint glassware. The apparatus can be clamped in this way because of the screw-cap connection between the condenser and reaction vial, which prevents the connection from falling apart. Heating is provided by a sandbath atop a magnetic stirrer/heater. A thermometer should be clamped in contact with the sand so as to allow monitoring of the bath temperature. The bath contains slightly more than 1 cm of sand - it is important to have enough to ensure good thermal contact with the reaction vial, but not so much that it is difficult to see the contents. |
| Extractions |
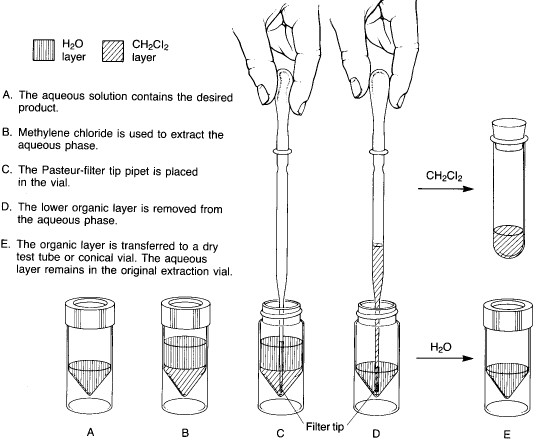
In microscale experiments, the conical reaction vial is the glassware item used for extractions. The two immiscible liquid layers are placed in the vial, and the top is sealed with a cap and a Teflon insert (with the Teflon side toward the inside of the vial). The vial is shaken to provide thorough mixing between the two liquid phases. As the shaking continues, the vial is vented periodically by loosening the cap and then tightening it again. After about 5-10 seconds of shaking, the cap is loosened to vent the vial, retightened, and the vial is allowed to stand upright in a beaker until the two liquid layers separate completely.
Two basic procedures are possible, depending on whether the solvent being used to extract the desired product is heavier or lighter than water. Method A is employed for extractions where the lower layer is a heavy solvent such as dichloromethane:
Method A - solvent heavier than water |
|
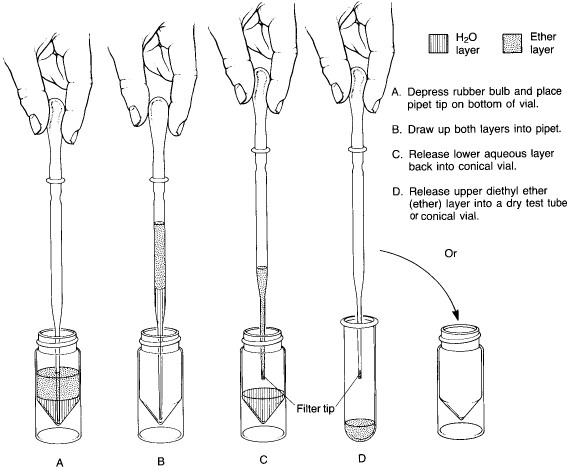
Method B is employed for extraction with a solvent which is lighter than water, such as diethyl ether. Note that in this technique, one draws both phases into the pipet and then returns the heavy (aqueous) phase to the conical vial. Ether is so volatile that it is often difficult to hold it in the pipet. Use of a filter-tip pipet for this procedure will help prevent the volatile organic layer from squirting out in an uncontrolled way.
Method B - solvent lighter than water |
|
| Recrystallizations |
Recrystallizations can be carried out using a conical reaction vial and conventional vacuum filtration to collect the crystals on a small filter paper, or in a Craig tube, which is a device designed specifically for recrystallization of very small quantities of materials.
In recrystallizations with a conical reaction vial, the conical vial simply takes the place of the Ernlenmeyer flask used for macroscale recrystallizations. The isolation of the crystals can be done in a number of ways depending on their form:
(i) Once crystallization is complete, the mother liquors and crystals are
vacuum-filtered through a small Hirsch funnel. Most commonly, the material is transferred
to the filter by pouring, using a microspatula to help transfer the crystals from the vial
to the filter. In cases where the crystals are fairly small and fluffy, it may be more
convenient to draw the entire mixture of crystals + mother liquors into a Pasteur pipet
and transfer them to the Hirsch funnel that way.
(ii) If the crystals adhere to the side of the flask, then filtration is unnecessary.
Simply use a filter-tip pipet to remove the mother liquors and transfer them to another
flask. Fresh, cold solvent is added to wash the crystals, and this is then removed with
the pipet in the same way. The crystals are then dried using a very light stream of air or
nitrogen, but care must be taken to ensure that the stream is light enough that the
crystals don't get blown out of the vial.
Craig tube Recrystallizations
Craig tubes are particularly useful for recrystallizing amounts of solid less than ~100 mg, the main advantage being that it minimizes the number of transfers of solid material and thus maximizes the yield of crystals. The separation of the crystals from the mother liquor with the Craig tube is very efficient, and little time is required for drying the crystals. The steps involved are fundamentally the same as those performed in macroscale crystallizations with an Erlenmeyer flask and a Hirsch funnel:
Step 1. In crystallizations where a filtration step is not required in order to remove insoluble impurities such as dirt or activated charcoal, this step can be done directly in the Craig tube; otherwise, a small test tube is used. The solid is placed in the Craig tube and the appropriate solvent is heated to boiling in a test tube placed in a sand bath. Several drops of hot solvent is added to the Craig tube, which is then heated in the sand bath while stirring continuously with a microspatula using a twirling motion. This helps dissolve the solute and prevent the boiling liquid from bumping. Additional portions of hot solvent are added until the solid is completely dissolved. Do not add too much solvent, in order to maximize the yield.
Step 2. When a hot filtration is necessary, the solid should be dissolved as much as possible in a test tube as described above. Alternatively, the solid can be dissolved in the Craig tube and the liquid transferred to the test tube using a Pasteur pipet preheated with hot solvent. To draw the liquid into the pipet, expel the air from the pipet and then place the end of the pipet on the bottom of the tube, being careful not to trap any solid in the pipet. The small space between the pipet and the bottom of the tube should allow you to draw up the liquid without removing any solid. Rinse the Craig tube with a few drops of hot solvent, and then add these to the test tube. This procedure serves to perform a rough pre-filtration to remove larger pieces of solid. The Craig tube is then washed and dried.
Step 3. The test tube containing the mixture is then heated in the sand bath, adding 5-10 drops of solvent to ensure that premature crystallization doesn't occur during the filtration step. To filter the mixture, take up the mixture in a filter tip pipet which has been preheated with hot solvent, and quickly transfer the liquid to the clean Craig tube. Passing the liquid through the cotton plug in the filter-tip pipet should remove the solid impurities. If this is unsuccessful, it may be necessary to add more solvent to prevent crystallization and filter the mixture through a filtering pipet. In either case, once the filtered solution has been returned to the Craig tube, it is necessary to evaporate some solvent until the solution is saturated near the boiling point of the liquid. This is best done by placing the Craig tube in the sand bath, and boiling the solution while rapidly twirling the solution with a microspatula. When a trace of solid material coating the spatula just above the level of the liquid is observed, the solution is near saturation and evaporation should be stopped.
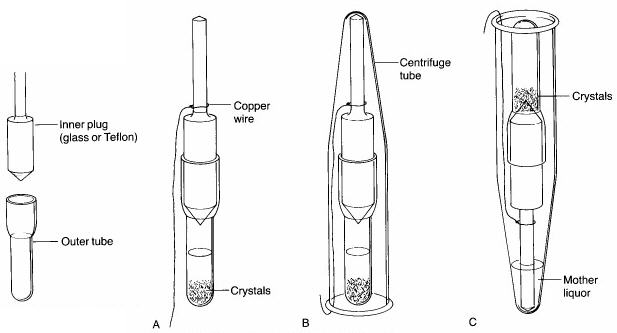
Step 4. The hot solution is cooled slowly in the Craig tube to room temperature. This is done by inserting the inner plug into the outer part of the Craig tube, and then placing the whole thing into a 10-mL Erlenmeyer flask. This provides some insulation to slow the cooling rate. The cooling rate can be slowed even further by first filling the Erlenmeyer flask with ~8 mL of hot water at a temperature below the boiling point of the solvent (be careful not to put so much water in the Erlenmeyer that the Craig tube floats). The Erlenmeyer flask containing the Craig tube is then placed on a few layers of paper and left alone to cool to room temperature. Once crystallization at room temperature is complete, the Craig tube is then placed in an ice-water bath to maximize the yield.
Step 5. Once crystallization is complete, a 3" piece of copper wire is wrapped around the barrel of the inner plug of the Craig tube (see 'A' below), and a Centrifuge tube is placed over top of it. After bending the copper wire back up the side of the centrifuge tube so that the Craig tube is held securely inside it (see 'B' below), the centrifuge tube is inverted (see 'C' below). The solvent should seep out of the Craig tube, leaving the crystals behind. The tube is then centrifuged for a few minutes to complete the separation of the mother liquors from the crystals. Using a microspatula, the crystals are then scraped off the end of the inner plug or from inside the Craig tube onto a watch glass or piece of paper. Minimal drying will be necessary.
| Distillation |
|
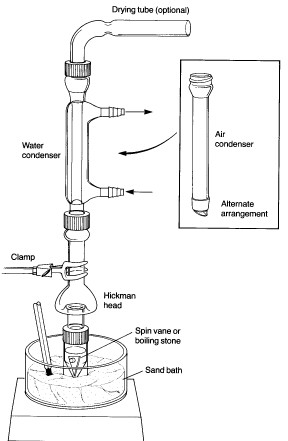
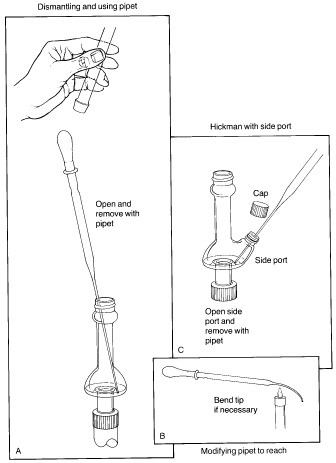
The key to successful microscale distillations is in avoiding long distillation paths, since this is the main factor leading to loss of material during distillation. Short-path microscale distillations are carried out using the Hickman distillation head as the receiving device for the distilled liquid. Two types of Hickman head, 'ported' and 'unported', are shown in the figure below. The complete apparatus consists of a flask or vial containing the liquid and a magnetic spin vane or boiling stone, attached to the bottom joint of the Hickman head. If desired, a condenser is attached to the top joint. A thermometer can be suspended down the middle in order to record the distilling temperature, with the bottom of the thermometer in the lower part of the Hickman head just below the circular well. The vapours of the heated liquid rise upward and are cooled and condensed on either the inside walls of the Hickman head or on the walls of the condenser. As liquid drains downward, it collects in the circular well at the bottom of the still. The well can contain as much as 2-mL of liquid. |
| Collection of fractions is easiest with the ported Hickman head; the port is opened and the liquid in the well removed with a Pasteur pipet (see 'C'). With the unported head, the liquid is drawn out from the top with a Pasteur pipet (see 'A'). If a condenser or internal thermometer is used, the distilling apparatus must be partially disassembled in order to do this. In some stills the inner diameter of the head is so small that it is difficult to reach in at an angle with the pipet and make contact with the liquid. This problem may be remedied by bending the tip of the pipet slightly in a flame. Once removed, the liquid is transferred to a small vial and capped with a Teflon-sealed cap. |
 |
| Go to: | Instructions for
Printing this Document |
wjl; 25-nov-97